
The main reason many people delay decluttering the closet is because it seems a never-ending task or overwhelming. Just the thought of doing it all at once stops you before you’ve started. This guide explains how to declutter your wardrobe in 4 simple steps that should take no longer than an afternoon and without overthinking the strategy.
A closet declutter boils down to four simple steps: first, empty the space first, sort everything into keep, donate, trash or move, declutter the wardrobe before putting anything back and return only what you use with a straightforward mindset. Do it step by step to get a closet that is lighter, tidy and easier to maintain.
Step 1: Empty Your Closet Completely

Starting with a simple but important step, remove everything from your closet, even the things which are hidden, or just accumulating dust in a corner. Now it makes you decide on every single piece.
Take all from your wardrobe, shoes, bags and any storage boxes so it all ends up on your bed or the floor. Being able to see it all in one place gives an immediate eye-opener type experience on how much you really own, making it easier to plan a capsule wardrobe.
It generally takes 15–30 minutes depending on closet size.
A small tip: Take a “before” photo, gives you a concrete starting point, and it keeps you engaged as you work through the process.
Step 2: Sort Everything Into Four Categories

Once everything is visible, sort them out with clarity. Keep it simple — four categories: keep, donate, trash and relocate, instead of creating confusing piles.
Keep clothes that fit you, that you wear frequently and are still in good condition. Donate Items — that still have utility but do not use on a regular basis. Trash items with irreparable damage. Move linens or random household items out of your closet.
One easy rule of thumb is the 12-month rule. If you haven’t worn something in the past year, you’re unlikely to wear it again. It covers every season and removes emotional bias from decision-making.
Sentimental belongings are an exception to this rule, but even those need limits. Do not keep everything, just a small memory box for the things that are meaningful.
Step 3: Clean the Closet Space Before Putting Things Back
Reset the space before anything goes back in. Many may get away with skipping this step, but it really makes a difference in the longevity of your system.
Finally, disinfect shelves, vacuum or sweep the floor and ensure no visible moisture or dust accumulation. If your closet utilizes shelf liners, now’s the time to consider replacing them.
Start finding your tweaks here. A good closet doesn’t need to be elaborate — slim hangers, basic dividers, or a few bins are often all it takes. Focus on building a simple system you can actually maintain, rather than over-organizing from the start.
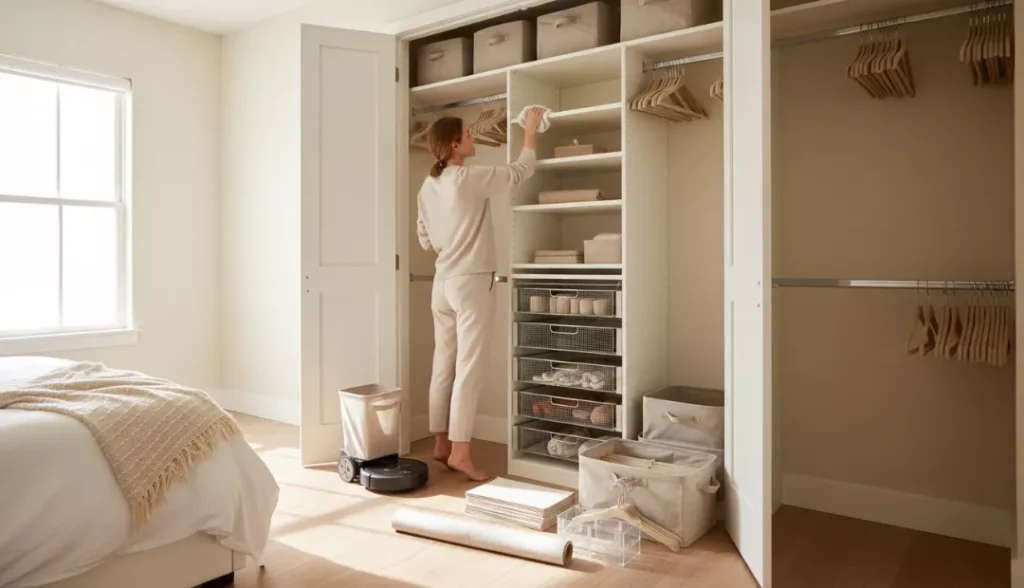
Step 4: Return Items With a System

This makes rearranging your belongings way easier, since you’re only putting back what you actually meant to keep.
First, classify components by similarity. Keep tops, bottoms, and outerwear in their own sections and allow for quick retrieval, while preventing a mess from re-forming.
Next, consider how often you use each item. Keep what you wear weekly at eye level or within arm’s reach, and use higher shelves or bins for off-season items.
Grouping clothes by outfit can help for some people. Pairing complete combinations to hang together results in quick decisions in those early mornings. This idea saves you time and reduces decision fatigue.
When in doubt, do not totally overstuff your closet. In other words, fill up to 80 percent, considered as a healthy amount so that your closet has a breathing space. Also things do not complicate when you schedule maintenance later.
An important step many people ignore is to get rid of the donation pile right away. Once you are through, get it out of the house or arrange for a same-day drop off. So, there is no chance of you overwriting the previous versions and the process will be final as well.
Once you finish do not forget to get rid of the donation pile, this saves you from second-guessing your decisions and keeps the process final.
Final Thoughts
So learning how to declutter your wardrobe really takes a step by step process, in a sequence, makes it feel manageable and more influential. Be honest to yourself when sorting, cleaning or arranging the space. These four steps apply to every closet size, from small to large; you just need a system and a strong mindset.
Keep visiting Fashioned Travel for more wardrobe organization ideas and smart style tips.
Explore More Fashion Guide: